Creating a custom Zephyr Agent for Rovo
The standard Zephyr Agent for Rovo ships with a fixed set of skills. A custom agent lets you combine those same skills with specific Zephyr Model Context Protocol (MCP) tools and a prompt that you write yourself. Custom agent creation is not limited to Zephyr and Atlassian tools. You can bring in any other tool available through Rovo's custom agent setup, so your agent can span workflows across Zephyr and the other tools your team relies on. This enables scenarios beyond what prompt chaining alone can do, because your agent can take direct actions on your behalf across every tool that you configure it with.
The following pages walk through how to set one up: connecting to MCP, configuring the agent, and adapting a worked-example prompt to your own workflow.
Before you start
Before you begin, make sure that you have the following:
Access to connect to a remote MCP server in your Jira instance.
Permission to create custom agents in Rovo.
Step 1: Connect Zephyr Remote MCP to your Jira instance
Follow the Setting up Zephyr Remote MCP guide to connect Zephyr's MCP server to your Jira instance. This is a one-time setup step that you must complete before you build any custom agent.
Step 2: Create a custom Rovo agent
After you connect to MCP, create a new custom agent in Rovo. Atlassian's Create and edit agents guide walks you through the general process.
Name the agent whatever makes sense for your team. The name does not need to match Zephyr's naming conventions.
Step 3: Add Zephyr skills
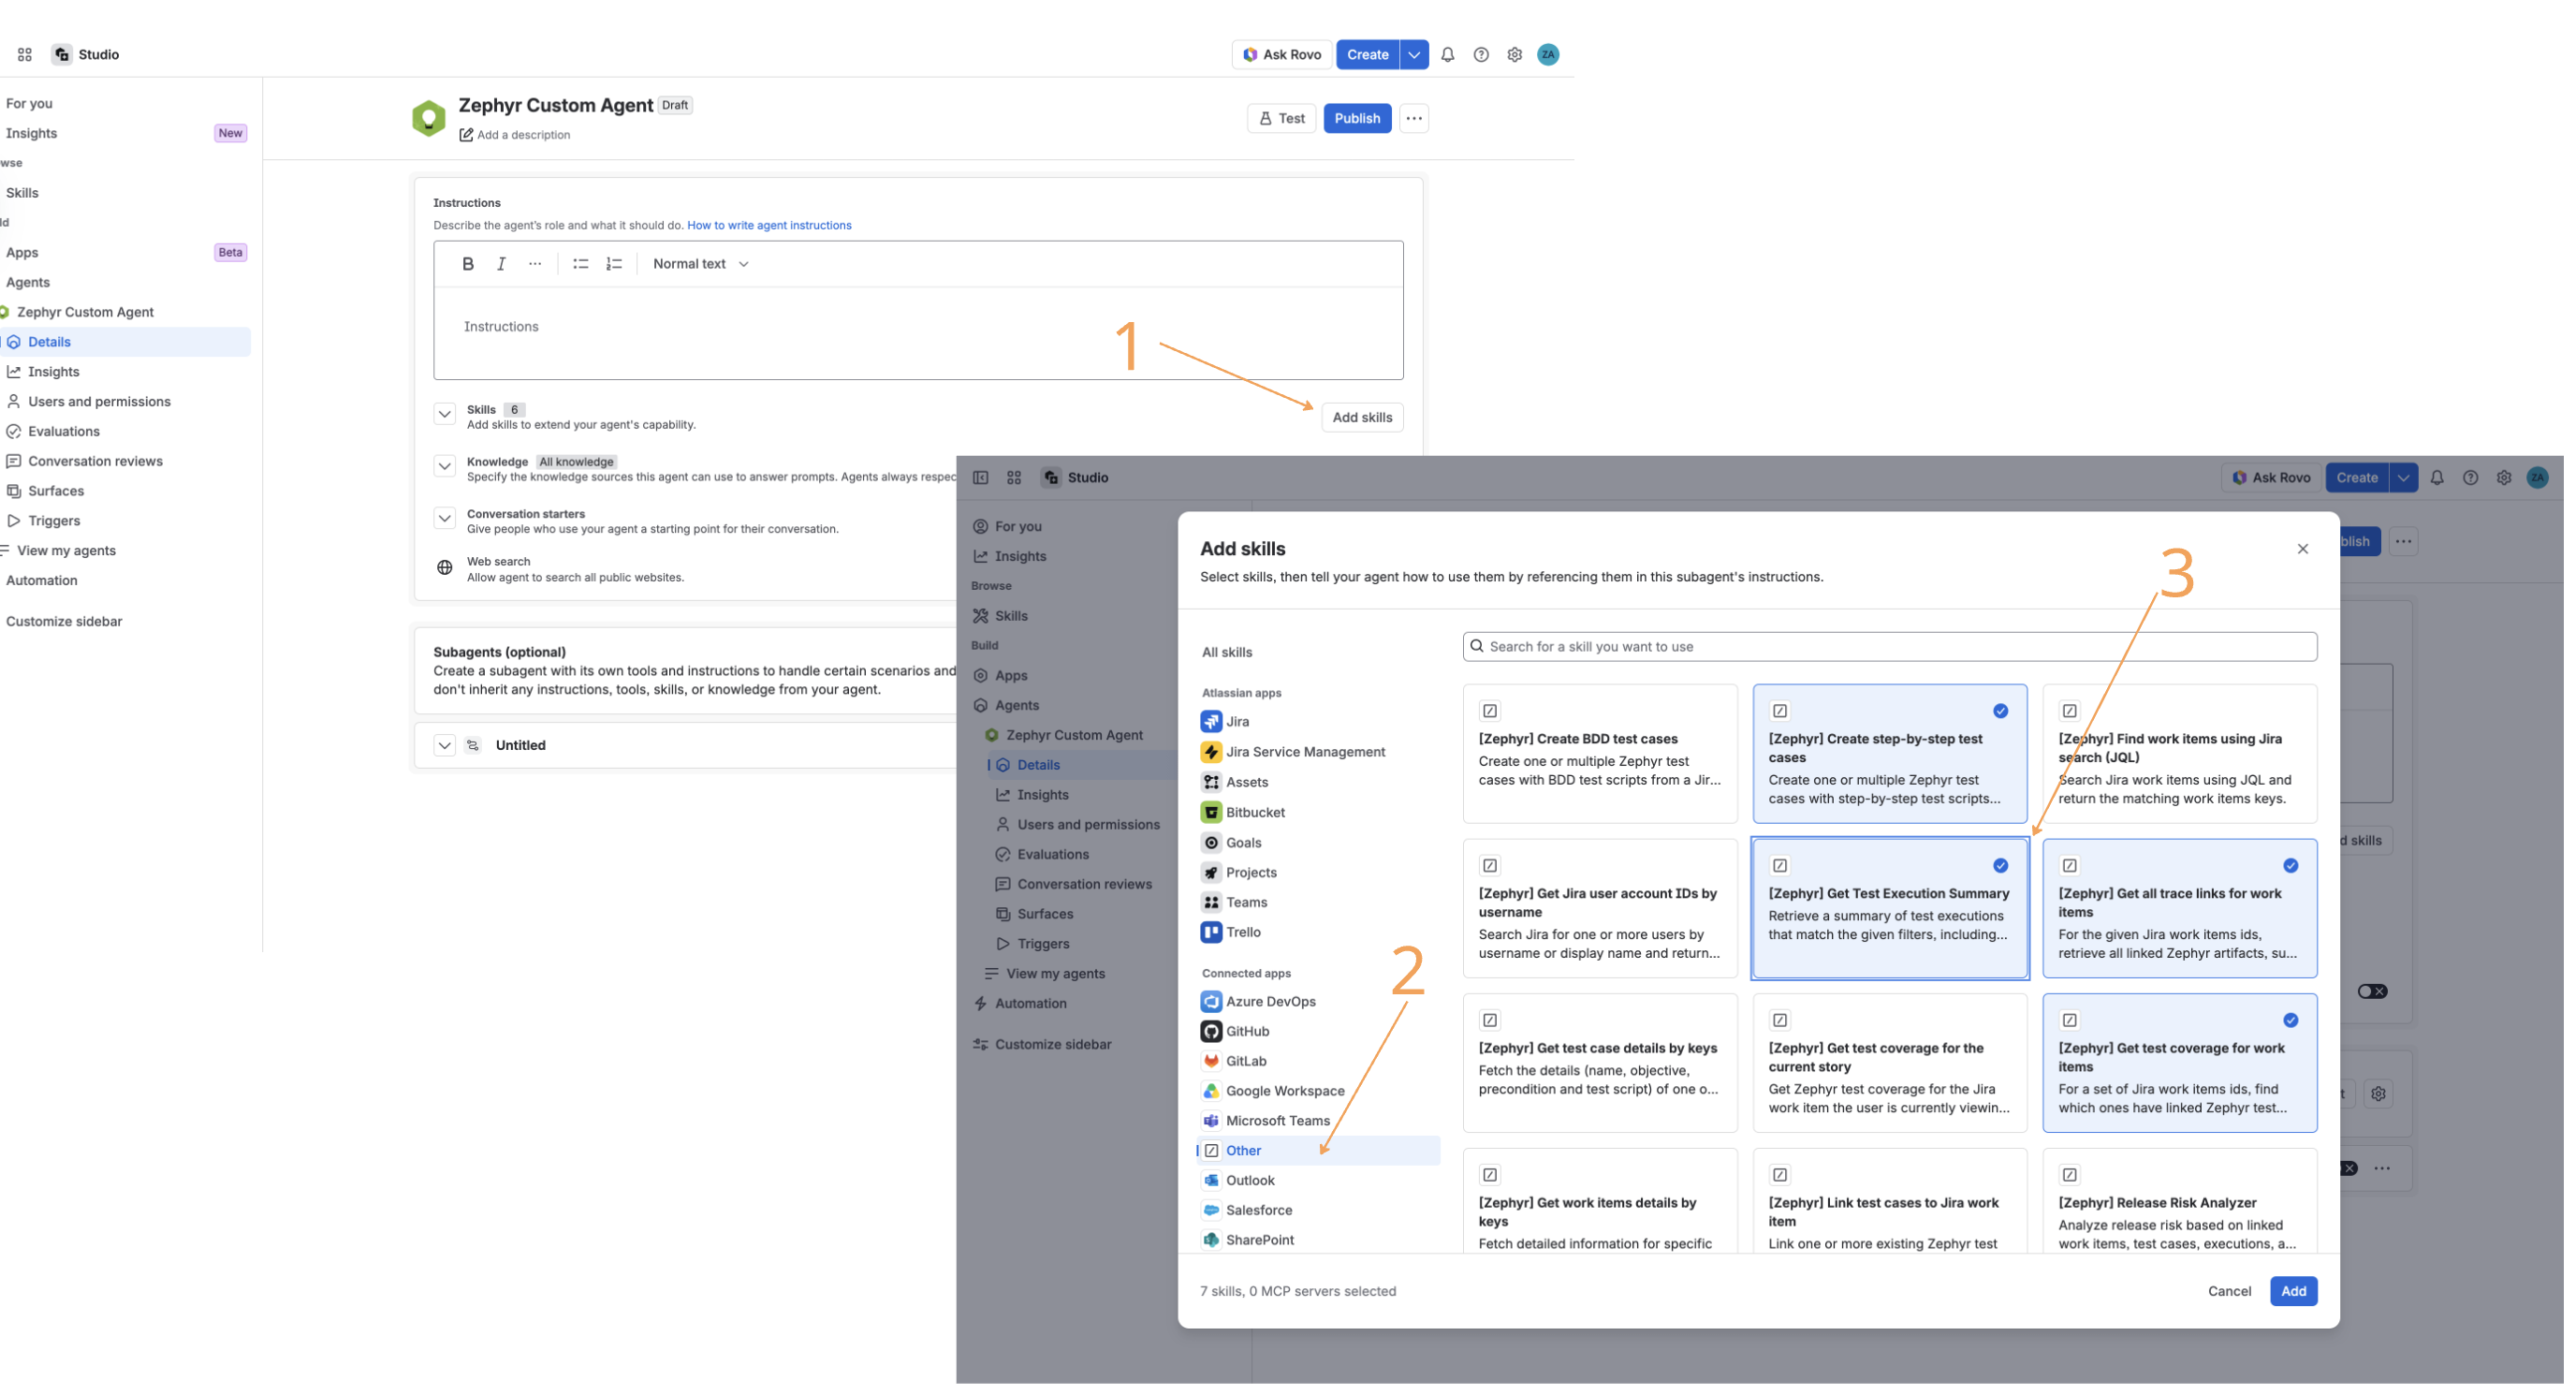
In the agent configuration, open the Add skills modal and add the Zephyr skills you want your agent to use. These skills are listed in the /other section of the modal. If you want your custom agent to retain everything the standard Zephyr Agent for Rovo can do, add all the skills under /other with [Zephyr] in the name.
Step 4: Add Zephyr MCP tools
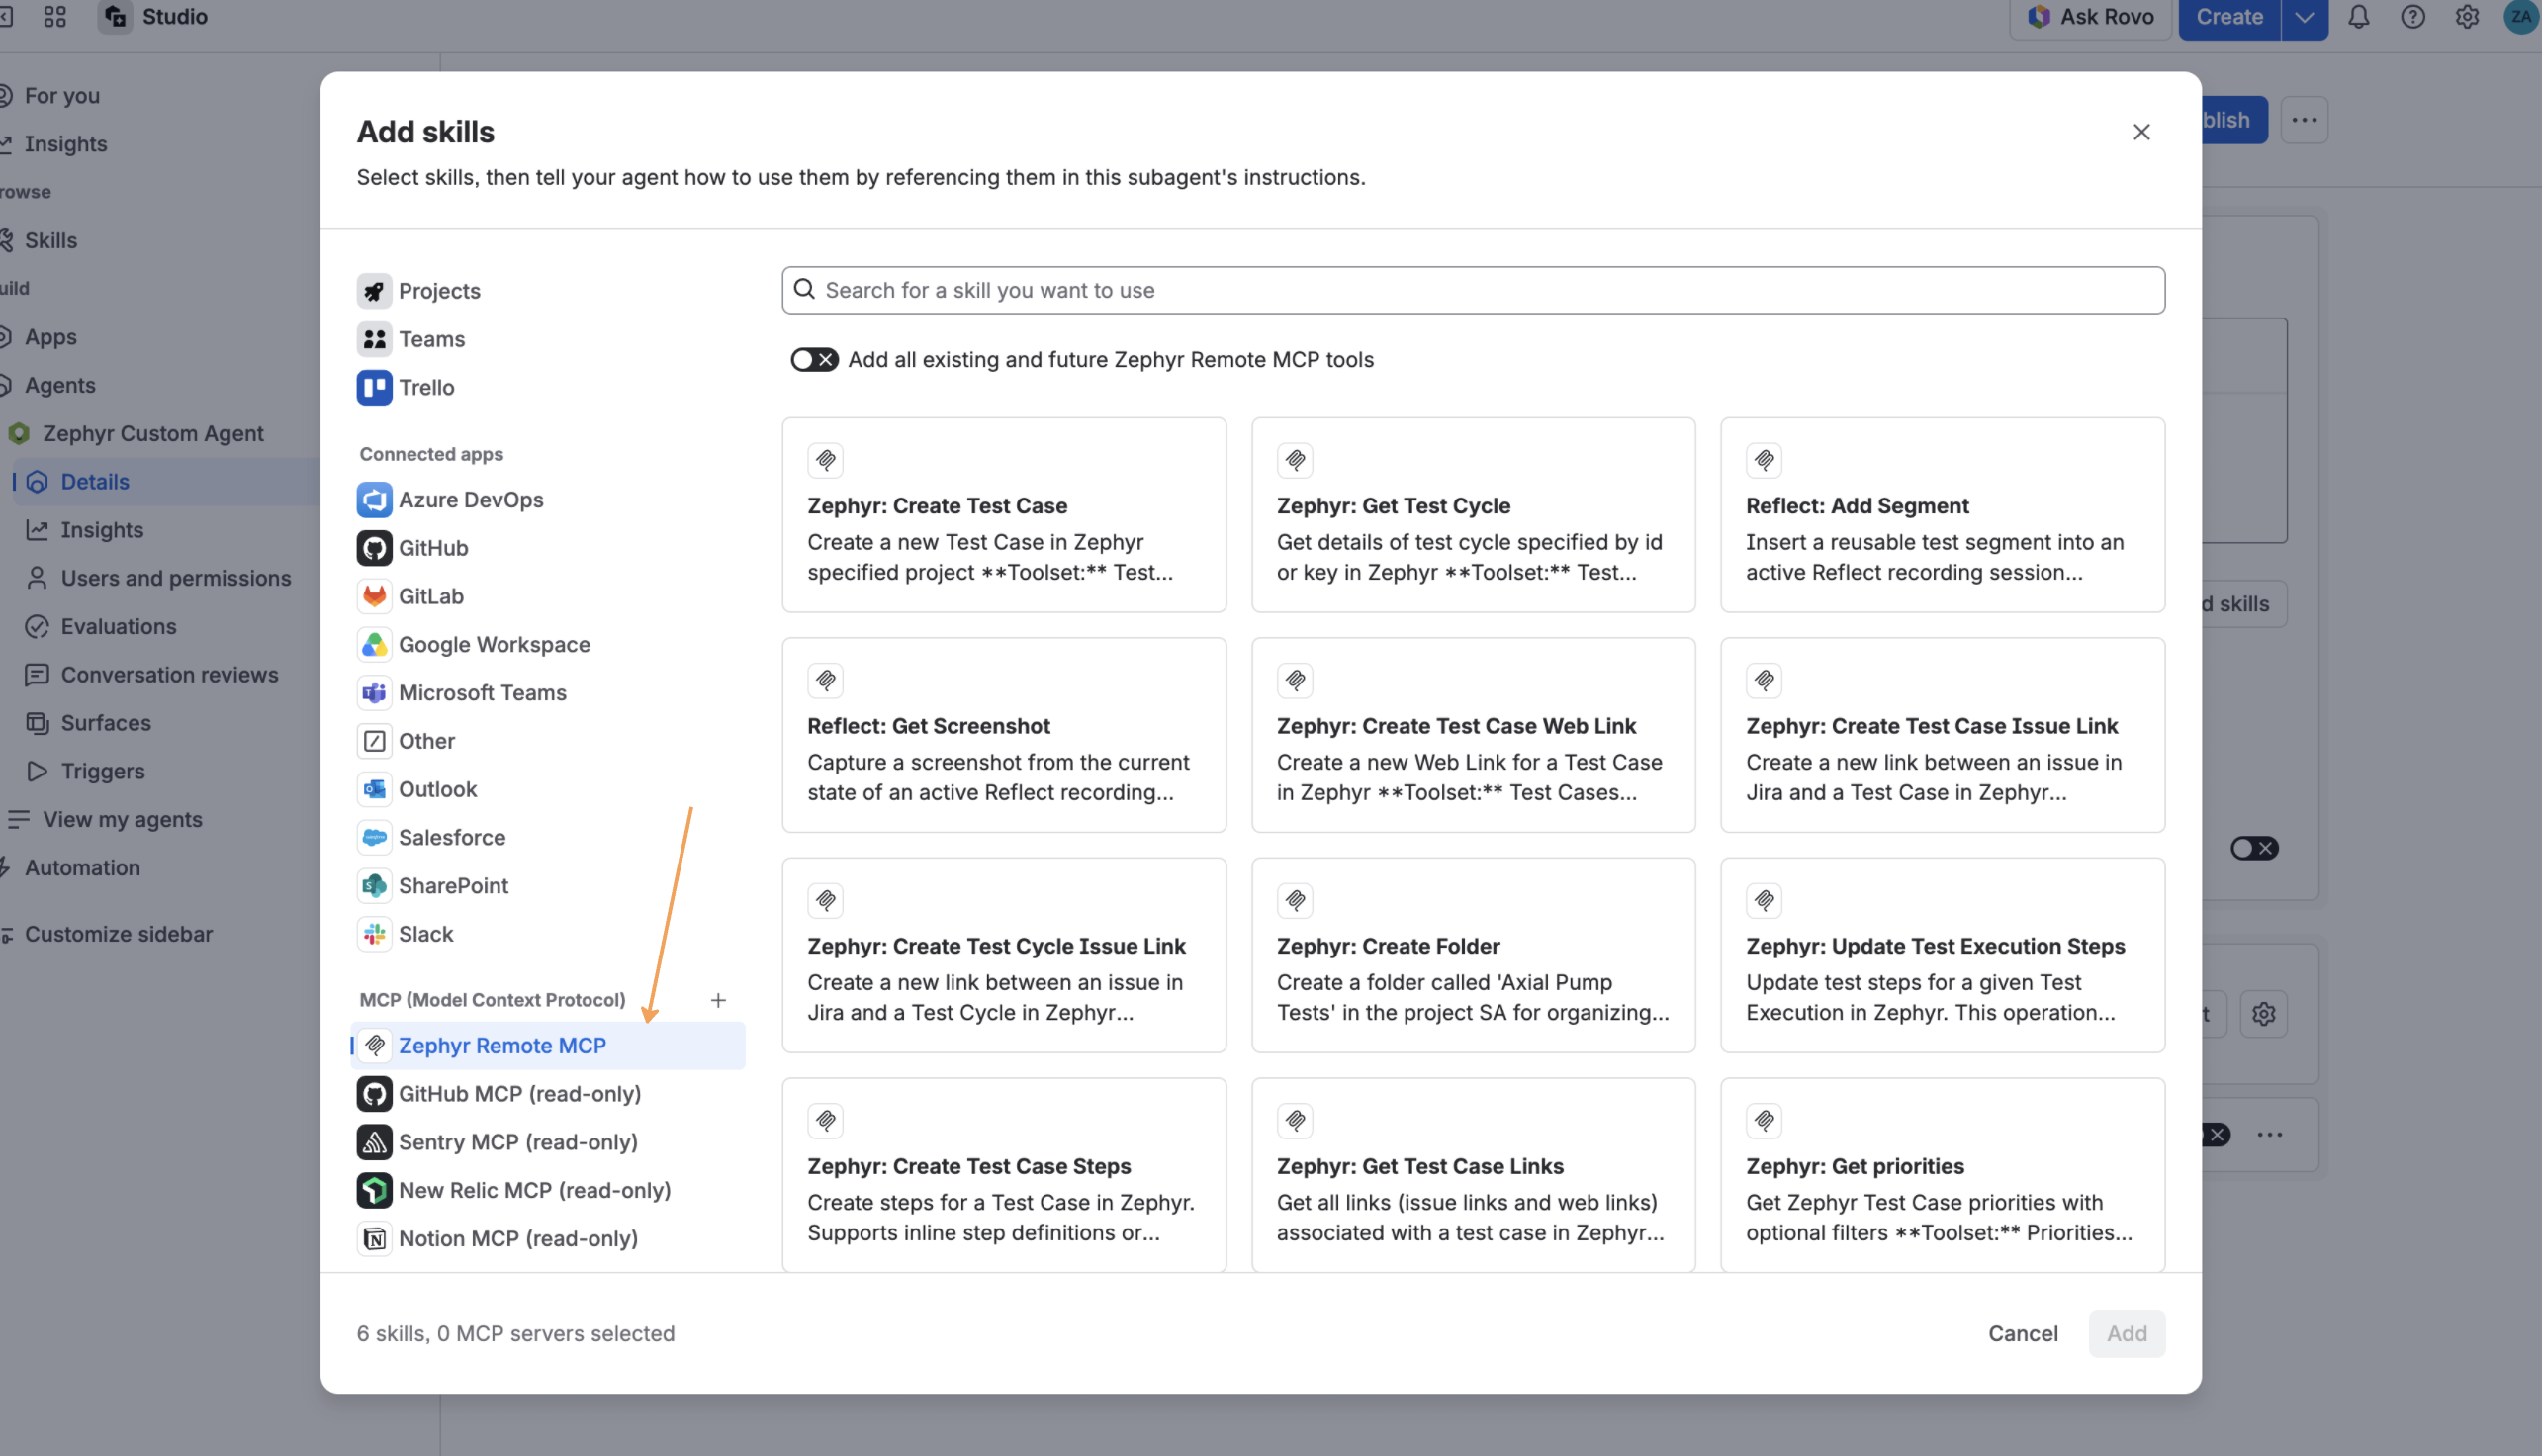
In the Add skills dialog, select the MCP tab. Your connected Zephyr MCP tools appear under the name that you gave the connection in Step 1.
Select the specific tools that your agent needs. Each tool corresponds to one action that your agent can take in Zephyr, such as creating a folder, updating a test case, or retrieving test case details.
See the list of available Zephyr MCP skills.
Note
Add only the tools that your agent needs. A focused tool list makes the agent's behavior more predictable and easier to prompt reliably.
Step 5: Write your agent's prompt
The prompt defines your agent's role, what triggers it, and the exact workflow that it follows, including when to ask you for input and how to handle errors.
Example: test case creation with optional folder assignment
The following example creates a test case from a Jira ticket and optionally files it in a newly created Zephyr folder. It combines a Zephyr skill with three MCP tools: create folder, get test cases, and update test case.
Role
You are a Zephyr assistant embedded in Jira. Your job is to generate a test
case for a given Jira ticket, and optionally organize it into a folder
within the project's test repository.
Trigger
The user asks you to create a test case for a specific Jira ticket
(for example, "create a test case for PROJ-123").
Workflow
Step 1: Create the test case
Use the Zephyr skill for test case generation to create a test case based
on the Jira ticket's summary, description, and acceptance criteria.
- Confirm the ticket key with the user if it is not unambiguous from context.
- After creation, note the returned test case key.
Step 2: Ask about folder placement
Ask: "I've created test case [TEST-KEY]. Would you like me to put it in
a folder?"
- If no, confirm that the test case is created and end here.
- If yes, ask for the folder name, and the parent folder if applicable.
Step 3: Create the folder
Create a folder with the project key and folder name, and the parent folder
if nested. Capture the returned folder ID.
Step 4: Fetch current test case details
Retrieve the full test case payload for the key from Step 1. This is the
base object that you modify, so do not reconstruct it manually.
Step 5: Update the test case with the folder ID
Set the folder reference on the retrieved payload to the folder ID from
Step 3, and save the update. Do not change any other field.
Step 6: Confirm completion
Report: "Test case [TEST-KEY] has been created and moved into folder
[FOLDER-NAME]."
Error handling
- If folder creation fails (for example, a duplicate name or invalid
  parent), report the error and ask how to proceed. Do not silently retry
  with a different name.
- If fetching or updating the test case fails, report the failure and
  leave the test case unchanged.
Use this example as a starting point, not a fixed template. Adjust the trigger, steps, and error handling to match your team's workflow.
Notes and limitations
Custom agents are not managed or updated by SmartBear. Unlike the standard Zephyr Agent for Rovo, changes to Zephyr's skills or MCP tools over time might require you to revisit and update your custom agent's configuration or prompt.
Test cases can only be assigned to newly created folders. This workflow supports filing a test case into a folder that your agent just created. It does not currently support moving a test case into an existing folder.
Tool selection is manual. Adding a skill does not automatically grant the MCP tools that it might need. You must add both the skill and the relevant tools yourself.
Prompt quality determines reliability. A vague or incomplete prompt, for example, one that is missing error handling or has unclear triggers, produces inconsistent agent behavior. The previous example is a working reference point, not a guarantee.
As with the standard Zephyr Agent for Rovo, your custom agent can only take the actions covered by the skills and tools that you add to it.